|

|
Getting Started with Microsoft Outlook 97
- Operating System: Windows 95
- Application: MS Outlook 97
|
|
Microsoft Outlook 97 is a desktop information manager program included with
Microsoft Office 97. One of its many capabilities is handling e-mail, and this
document describes how to configure Outlook for your Infomatika mailbox.
|
Configure Outlook
- From the Outlook Tools menu, choose Services...
- Select the Services tab.
- If Internet Mail appears in the list of services:
- Highlight Internet Mail.
- Click the Properties button.
- Go to step 7.
If Internet Mail does not appear, continue with step 4.
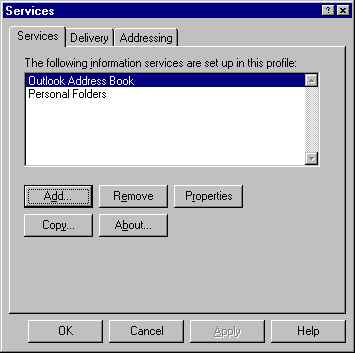
- Click the Add... button.
- In the Add Service to Profile window, highlight Internet Mail.
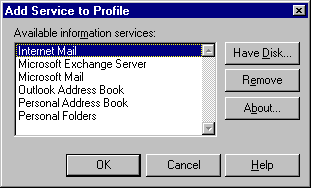
- Click OK.
- In the Internet Mail window, select the General tab.
- Enter your full name and e-mail address under Personal Information.
- For Internet Mail server, enter post-office.yourdomainname.com
- For Account name, enter your username (note that this is case-sensitive).
- For Password, enter your e-mail password (also case-sensitive).
- Select the Connection tab.
- Under Connecting to Internet Mail, choose connect using the modem.
- For Dial using the following connection, select Infomatika connection.
- Click OK.
- If you have added the Internet Mail service, you will be prompted to restart Outlook. Click OK.
- Click OK again to dismiss the Services window.
- Quit and restart Outlook if necessary.
Sending Mail
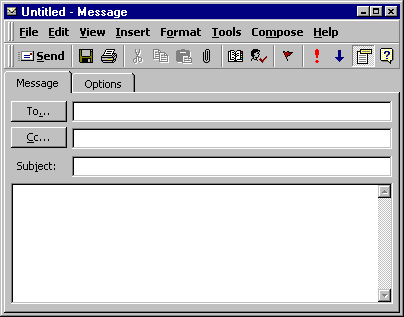
- To write a new e-mail message, from the Compose menu, choose New Mail Message.
- Enter primary recipients in the To field, carbon copy recipients in the CC field (optional), and a title for the message in the Subject field.
- To attach files to the message, from the Insert menu, choose File...
- When your message is finished, click the Send button. This places the message in your outbox, and it will be sent the next time you check mail.
Checking Mail
- To check for new mail on the server, from the Tools menu, choose Check for New Mail...
- New messages will be downloaded and placed in the Inbox.
- To read a message in the Inbox, double-click on it.
- To reply to the message, click the Reply button. To forward it, click the Forward button.
- To file the message in a folder, from the File menu, choose Move to Folder... or Copy to Folder...
- To delete the message, from the File menu, choose Delete.
|


